Showing posts with label recipe. Show all posts

Monday, June 11, 2012

CB Makes Coleslaw

Vinegar-y, peppery slaw
I have this thing about unnecessarily cooking things from scratch. Why make my own BBQ sauce when there are millions of great store-bought varieties? Why cook beans from scratch when opening a can takes a fraction of the time? Why in the world would I want to make my own coleslaw when I can just get it already prepared from any grocery store?


There are two reasons, at least for me. The first is the ability to prepare said food item exactly the way I want it- assuming I can make it at all. The second is the satisfaction of not only preparing it myself, but gaining a better idea how it's made. For a long time there were many dishes and sauces shrouded in mystery; there was no way I could ever figure out how to make them. Things like pasta sauce, bread, chilli, salad dressing... Once I tried to make these things, I realized it's not too hard to find out how.


Turns out, there's the internet. And the internet knows a lot of stuff. All you have to do is weed out the bad stuff and take the good stuff!


I'm obsessed with barbeque (barbecue, barbacoa, whatever you want to call it... I prefer BBQ) for a bunch of reasons I'll probably mention later when I post the results of my Oven-Smoker Experiment. In my mind, the perfect accompaniment to a rich, savory and perhaps fatty piece of slow roasted meat is a sharp kick in the head in the form of something tangy, sour, and maybe even bitter. I love pickled cucumbers or jalapeños with my BBQ; I've made pickled red onions to go with carnitas... To top my hopefully delicious oven-smoked chopped bbq pork, I decided to try my hand at coleslaw.


Growing up I remember having all different kinds of coleslaw often; at home, at potlucks, at foot ball games... My favorite kind was always the extra-tangy, extra-peppery, and not-so creamy kind. Turns out, I was able to create a pretty tangy and peppery coleslaw that wasn't too creamy for me. (I loosely based it on this recipe.) If you make it yourself, feel free to vary the amounts to suit your own particular preferences. Pretty sure the Otts have a good recipe- might be a family secret though.


WHAT YOU NEED
For the slaw:
1 head of cabbage
2 carrots
1/4 white onion (or red, yellow, whatever)

For the dressing:
1 cup mayo
1/2 cup apple cider vinegar
Salt and pepper to taste (I used a LOT of black pepper)

HOW YOU MAKE IT

1) Shred the cabbage (I was amazed how much shredded cabbage comes from a single head.. and also how cheap cabbage was.. I think $.88 a head!)


2) Shred the carrots (I used a veggie peeler to get carrot strips)


3) Slice the onion fine


4) Combine all the veggies in a big bowl

5) In a separate bowl, whisk/stir/whatever the mayo, vinegar, and any seasonings you'd like

6) Pour over veggies, stir well, taste for seasoning if desired

7) You can eat it immediately, but everything is a little too crispy at this point.. It's best if it sits in the fridge overnight. If there isn't a huge amount of dressing, it seems like a good idea to stir the slaw periodically.

WHAT ELSE YOU COULD DO
Because this recipe is so simple, you really could do pretty much anything else. Next time I might add some sliced radishes to the slaw; or use red onions instead of white; or add some thin poblano strips for a little bit of heat; I'm sure a little sour cream would make this very creamy, but I generally avoid creamy things. Except ice cream.

I will probably eat this alone (like I just did a second ago) or as a BBQ pork topping, or as a side dish to some other grilled piece of meat. As I type the vinegar and pepper still tingle in my mouth; I can't wait to see how this works with some slow cooked dry rubbed pork.

Monday, May 7, 2012

How I Got Into Fishing

Me, fishing
A lot of people are confused with my love of fishing.

Especially those who have known me a long time. My interests seem very incongruous if I really think about them, I suppose. Music, video games, computers, technology, Mexican food, cooking, fishing, kayaking. Then again, I try to like things I like and not worry too much whether they go together or not. My favorite type of music is probably hip-hop (the Mos Def and Common variety, with Q'tip and J-Dilla thrown in) but I also love traditional Cuban music, jazz, death metal, Les Baxter, etc. Genuinely, not ironically. There's something about west African mbira music that gets me going. And I'm a huge fan of anything that is released on Berlin's Kompakt label. I listen to contemporary country music on the radio- for enjoyment.

(...But I also do lots of other weird things, like when two songs accidentally play at the same time - like two youtube videos opened simultaneously - I like to just let them both play and hear what they sound like together)

I guess the point is, I like stuff and can't always explain it. That's how fishing is.

It doesn't really make sense. Sure, I can say the idea of little meals swimming around the lake appeals to my interest in cooking. And I like understanding the whole process of making something, like cooking beans from scratch, or carving wooden fishing lures, or writing a messy bash script that does something ridiculous on my computer.

But it doesn't really explain it. I love fishing, and I love other stuff, for no particular reason.

Me and a little fish
My new buddy Sam Bennett, who you may remember from such CB Fishes posts as this one, is putting together a new site dedicated to fishing the Fox River. Turns out it's called the Fox River Fishing Network, and I highly recommend you check it out! Sam invited me to contribute some posts, and the first one went up today.

As much as I've talked about learning to fish, my trials and tribulations, I haven't really written about how it all started. I still can't figure out the why, but I can certainly relate the how and especially the who. If it weren't for Mark, Rob, and Luke - my fishing teachers, my dog Walter, and Kevin Smith who works at Cabela's, there would most likely be no CB Fishes. CB would not fish.

So if you're curious how an indoor dude like myself suddenly developed a love for the outdoors, head on over to the Fox River Fishing Network and check out my post. While you're there, check out the other posts too- there's some good stuff going on.

Lately I've been expanding my outdoors knowledge; after so many trips to the Fox River, standing there in the water with nature all around me, I've started to get curious about it all. What are those tracks in the mud there? What kinds of birds are those? How many of these plants lining the river are edible? Last week I finished Bradford Angier's How to Stay Alive in the Woods, and today I'm almost done with the book The Mindful Carnivore by Tovar Cerulli. Maybe I'll write a review about it. It's an amazing book. If you eat food, are vegetarian, or are a hunter, or either or neither of those things, I highly recommend the book.

This is a carp that lives only a few feet from
the Itasca Metra station
That's all for now... if I get around to it maybe I'll share this past Sunday's trip to the Fox. No fish caught, but I stared down some deer for a few minutes. I made some more lures, bought a swiss army knife, and now I know how to get vitamin C and protein if I'm lost in the woods (pine needles and bugs, in case you were wondering).

Thursday, January 12, 2012

CB Cooks: Frijoles Borrachos (Drunk Beans)

Beans + bacon + tequila = awesome
This is not a "receta auténtico" by any means, it's more of a CB recipe based on some Mexican recipes and Rick Bayless' one by the same name. As I understand it, the general idea behind any type of frijoles borrachos (drunk beans) is to cook beans, then right before serving splash some tequila in them. Sometimes "borrachos" refers to cooking the beans in beer. Either way, sounds great, right? I've found cooking beans in beer makes them taste a little better, but adding some tequila right before serving makes them taste A LOT better.


As things get colder and we finally start making our way into winter, I thought this would be a great dish after a long day out on the cold water.


WHAT YOU NEED
Mayacoba aka peruano beans
they cook up big, yellow, and very creamy
- Beans - I used yellowish mayacoba beans; also known as peruano beans in some places. No matter what they're called, they cook up big and soft, much creamier than pintos or black beans.
- Onion - about half a white onion
- Garlic - 4-6 cloves
- Bacon - I used 3 long strips
- Green chiles - the name "green chile" really refers to any chile (aka "pepper" for us gringos) that is in it's green stage of ripeness. Although that's true, normally "green chile" refers to a mild green chile like anaheim or new mexico. I used a combination of poblano (the green fresh version of ancho) and jalapeño
-  Tomatos - I used a can of diced tomatoes, the ones at the store didn't look so nice (which is often the case)
- Salt, pepper, cumin
- Tequila (optional..?)
- Water

- Crock pot (or dutch over, or a pan or something)

HOW YOU MAKE IT
1) Fry the bacon, get it crispy, remove from pan, cut up, and add to crock pot

2) Add diced onions and green chiles to bacon fat, get them nice and golden

Mmmmmmm smells so good
3) Add minced garlic for 2-3 minutes, but don't burn it!

4) Add contents of pan to the crock pot

5) Add dry beans to crock pot (Some people swear by soaking beans overnight- I almost never do that, and they always turn out just fine. It may take longer to cook them, but if you're using a crockpot, who cares?)

6) Add the tomatoes and seasonings (salt, pepper, cumin, whatever else) and fill with water (or stock, or beer) generously

7) Crockpot: cook on low for a long time (8 hours?)
     Stovetop: bring to a boil, then simmer for a long time (2-3 hours?)

8) Once the beans are cooked (pick one out with a spoon and blow on it- if the skin wrinkles and peels back, it's done!) add a splash (a tablespoon or more) of tequila (or mezcal if you're daring)

9) Top with minced raw white onion, chopped cilantro and serve! Even better the next day, like most long-cooked dishes. The combination of bacon/cilantro/onion/tequila is pretty awesome- it's hard to imagine until you try it- it's delicious!

WHAT ELSE YOU COULD DO
- Almost anything! This is barely even a recipe...
- Substitute any smoked pork product for the bacon
- Use dried chiles instead of or in addition to fresh green chiles
- Use any other kind of bean (pinto, negro, great northern, etc.)
- Don't use tomatoes, or use tomatillos, or just splash with some vinegar, or lime juice
- More seasonings (like bay leaf, oregano, smoked paprika, anything good!)
- Cook the beans in beer (light beer like Corona or even dark beer like Negro Modelo)
- Cook the beans in stock (like chicken stock, beef stock, pork stock, veggie stock, whatever)
- Add more veggies like carrots, celery, etc.

Tuesday, January 10, 2012

CB Cooks: Pan fried trout with baconed mustard greens


Although at the beginning one of the main appeals of fishing was catching food to eat, I haven't done that so much. I rarely keep any fish I catch, mostly because the places I'm fishing are somewhat polluted, or because I don't have any way to get my catch home (especially if I'm fishing downtown before work). I'd like to combine my fishing skills and cooking skills more... To that end, I've been practicing some fish-cooking techniques so when I catch some fish worthy for the plate, I'll be ready!


I'm a total newbie at cooking fish, but I thought this turned out so great I wanted to share it with you. I'm sure many of you anglers have better recipes, if you have any tips leave them in the comments!


Full disclosure: I got the whole idea from the always great Serious Eats and this recipe

WHAT YOU NEED
- Some fish (filet). I caught mine at Meijer, using a credit card
- Corn meal
- Butter/olive oil/stuff like that
- Greens
- Bacon
- Onion
- Garlic
- Salt, pepper, crushed red pepper
- Cast iron skillet - HIGHLY RECOMMENDED!


HOW YOU MAKE IT
For the fish:

1) Cover the fish with corn meal, covering as much as possible

2) Plop the filet(s), flesh-side down, into a hot cast iron skillet that has hot oil/butter/whatever in it

3) Leave it for about 5 minutes (don't move it)

4) Flip, then cook for a couple more


For the greens:
1) Put the bacon in a pan, get some of that bacon fat happening

2) Dump in some minced onions and get them nice

3) Throw in some garlic, and while you're at it remove the bacon, chop it up, and return it to the pan

4) When all that stuff is real nice, add salt, pepper, crushed red pepper, and the greens (torn into bigger than bite-sized pieces)

5) Cook for a couple minutes- the greens will turn super bright green and shrink a lot

Thursday, January 5, 2012

CB Cooks: Falafel and pita bread

Falafel sammie with onions, poblanos, carrots, and tahini
One of my all time favorite foods is falafel, which is basically fried balls of some combination of chickpeas and/or fava beans. You might know I love anything involving beans, and the combination of beans and frying is a total winner. I'm pretty sure the healthiness of the beans and veggies totally outweighs any downside of frying stuff in oil. I tried for YEARS - literally - to make them at home, but they failed every time, falling apart in the oil, turning into fried hummus.


I think it was about a year ago I found another way, a method somehow I'd missed in my research. Don't use cooked beans! I found some recipe somewhere that suggested soaking the beans overnight, then grinding up the RAW beans for use in falafel. For whatever reason, this makes it much easier to keep the bean balls in one piece, and makes for a deliciously textured falafel.


I've also dabbled in bread baking (I love the book Artisan Bread in 5 minutes a day) and tried making some pita bread for my falafel. It didn't really turn out like the super thin pita "pockets" found in many Lebanese restaurants, but it was still pretty awesome. It's more like normal soft bread, without a hard crust, kind of like hamburger buns or torta bread. 


There aren't too many things better than freshly baked homemade bread.


WHAT YOU NEED
For the CB falafel:
A bunch of chickpeas and/or fava beans, soaked in water overnight (I think I used 1 pound of beans, which yielded 11-12 big falafels)
Tahini (sesame paste- it's like a more liquidy peanut butter, but made out of sesame seeds)
1/2 big white onion
5-6 cloves garlic
Handful cilantro
Jalapeño
Cumin, salt, pepper, any other seasonings you like
A little bit of flour

For the bread:
1.5 cups flour
1 teaspoon dry active yeast
1/2 teaspoon salt
Water
Cornmeal for dusting (optional, but helpful)

HOW YOU MAKE IT
The bread:
1) Mix the flour, yeast and salt in a big bowl

2) Add about 1 cup water, mix

3) With your hands, divide up the dough ball into 4 little balls, then hand-roll them out into little circles

4) Put them on a baking sheet sprinkled with cornmeal (so they don't stick as much) and preheat the oven to as close to 500°F you can get. If you don't want to bake them immediately, cover them with a clean kitchen towel so they don't dry out

Ready for the oven
5) Bake for ~3-10 minutes- but watch closely! Once they puff up, they're pretty much done!

Doesn't that just look magical!?
The falafel:
1) In a food processor, process the beans, onion, garlic, cilantro, jalapeño (you might have to do it in batches)

2) In a big bowl, add about a tablespoon of tahini, a tablespoon of flour, and your seasonings. Mix well!

3) Grab a clump of the mixture, smush it together in your hand- if it seems like it will stay together, you're good to go! If not, add some more flour.

4) Form little balls in your hands, pressing them to make sure they won't fall apart. Place on a cookie sheet or something. I've found it helps to put the balls in the fridge for a while before frying.

Ready for the fridge, or the oil
5) Get 1-2 inches of oil hot in a pan, then fry the balls. Because it's not deep frying, they turn out to be more like patties instead of balls... But I think that's better for sandwiches anyway.

6) As soon as both sides of the patties are nice and brown, remove from oil and place on some paper towel to absorb residual oil. Immediately sprinkle with salt; repeat for remaining patties.

When you first drop the falafel in the pan, DON'T MOVE IT for at least a minute! You want to form a nice crust, which will help the ball stay together. Don't worry about it sticking to the pan- once the crust forms, it will become unstuck.

WARNING: Don't crowd the pan! You want to fry these guys, not steam them. 
SUGGESTION: If you have any cast iron cookware, this is an ideal time to use it! It will thank you later.

Mmmmm so crispy, salty, and chickpea-y
7) Serve immediately in your fresh "pita" bread!

WHAT ELSE YOU CAN DO:
- I like my falafel in bread, with lots of toppings. This time I used sliced onions, raw poblano strips, and thin carrot strips I cut with a peeler. If I had any, cucumbers and tomato are great additions.
- Tahini alone makes a great sauce- I tried making a lime-garlic-tahini sauce for this, but it tasted like messed up candy...
- Falafel burger!

Apparently in Egypt or Lebanon (or both?) McDonald's has a McFalafel
I wonder if this tastes better than that...

Thursday, December 29, 2011

CB Cooks: Mole ("moe-lay")

Makin' mole! (with my new homemade hand-carved mole stirrer)
When anybody mentions "mole" (the sauce, not the animal) a lot of things often come up.

"Oh yeah, the Mexican chocolate sauce," "It's super hard to make!" "It has so many ingredients in it" "It's too sweet for me" "I've had the premade kind and I don't like it one bit" "It was invented by nuns who had to feed some important guy and only had chiles and nuts and stale bread in their kitchen" "It takes three days to make" "How the hell do you pronounce it?"

As far as the last question, I'm pretty sure it's "moe-LAY" for us gringos, with the accent on the last syllable. Not sure why there isn't actually an accent there, perhaps because the word comes from a pre-columbian language. (In fact, I'm pretty sure "moe-LAY" just means a mixture of stuff or a sauce; the word "guacamole" just means "mixture/sauce of avocados". Pretty sure, not completely sure, so don't quote me on that. My spanish degree only covered spanish, not native mexican languages.)

I'm a huge fan of mexican food, and many say the concoction known as mole is the greatest accomplishment of the entire cuisine. In a lot of ways it is very complicated- many ingredients, many flavors, and the complexity only gets more complex when you serve it with other food like turkey (as is traditional for many moles). (Remember- "moe-LAYS" not "moles")

As I understand it, often mole is prepared on special occasions, because there are many ingredients; also, it's often paired with slow-cooked meat, which of course takes a while to cook. For these reasons (and probably many others) mole is one of those dishes (like tamales) that seems difficult and beyond reach for us lowly gringos. Especially on any day that isn't sunday!

Well I've got news for you! I'm definitely no expert in mexican cooking- but I think I have at least a handle on making "moe-LAY." In fact, I made some last night (on a wednesday night!). It took about an hour, and it will be even tastier today. I've made it a bunch of times, and I think I've come up with some rough guidelines (i.e. not an exact recipe) for making mole. In almost every mole recipe I've ever seen (in english OR spanish) there are certain types of ingredients that are always present. Based on that "research," I've come up with a list of ingredients- basically, you need at least one thing from each category to prepare your mole. Just to reiterate, I'm no mexican cooking expert, and this is most likely complete blasphemy... But it tastes just like mole in restaurants. If I had a mexican aunt, maybe this is what her mole would taste like.

Below I've listed the 6 categories, and some common ingredients that go in those categories. My idea is this: if you take at least one thing from each category, you will have something that is pretty much a mole.

INGREDIENTS:

FRUITS
- like dried chiles (absolutely necessary), raisins, bananas, plantains, etc

NUTS
- peanuts (or peanut butter!), walnuts, almonds, sesame seeds, pecans, etc

SPICES & HERBS & STUFF
- cinnamon (or mexican canela), anise, cloves, cumin, oregano, avocado leaves, allspice, coffee, and yes maybe even chocolate (but it's not entirely necessary!) - and SUGAR

VEGETABLES
- onions, garlic, tomatoes or tomato sauce, etc

LIQUID
- broth, stock, water, chile soaking liquid, beer, anything!?

THICKENERS
- masa (like prepackaged tamale mix i.e. Maseca, or fresh from the tortillería), stale tortillas, toasted stale bread, animal crackers (I've heard this is a common old mexican lady addition)

HOW YOU MAKE IT:

Most recipes call for a very involved individual frying of each set of ingredients before everything is combined and blended together. I don't doubt this makes a thicker, richer, more voluptuous sauce... But this also exponentially lengthens the time needed to make this dish. When I make this, generally, I just throw everything into a blender and blend away! (If I fry anything, I'll get some onion and garlic looking toasty in a pan with some oil before adding it to the blender). Basically, here's the process:

L-R: Cloves, allspice, ancho chiles, piloncillo (sugar), tortillas,
oregano, pepper, onion, cumin, garlic, peanut butter,
tahini, walnuts NOT PICTURED: oil, guajillo chiles
1) ASSEMBLE your ingredients (at least one from each category, and you pretty much must use some kind of chiles)

For my wednesday night mole, I used:
dried ancho and guajillo chiles (fruits), peanut butter, walnuts, and tahini (ground sesame paste) (nuts), cloves, cumin, oregano, allspice, and some mexican piloncillo sugar (spices), onions and garlic (vegetables), chile soaking liquid (liquid), and stale corn tortillas (thickeners)

2) If your dried chiles are hard and old, and you can't run out and get some more, you might want to rehydrate them. Put them in a bowl, cover with hot water, and let them sit for 30 minutes or so. Mine were old, so I did this yesterday. Rick Bayless says if the soaking water is bitter, throw the water away.. If not, use it in the recipe! Mine last night was sweet tasting, so I used it. Many people will toast their dry chiles in a dry skillet before soaking, but I didn't do that. If you do it, make sure not to BURN the chiles.

soaking chiles (smells a whole lot like raisins)
3) BLEND - Add everything to the blender, and blend the &*#$ out of it. It might be better to add things in steps, to make sure everything gets blended.

4) STRAIN everything! This is key. The idea is to get a homogenous, velvety sauce with no lumps whatsoever. I have a strainer I pretty much only use for mole, I call it my mole strainer. 

Strain! Check out that gorgeous color. All that red/orange is from the chiles,
no tomato products here
5) Take the strained liquid and put it in a pan. If it's really really thick, add more liquid.

6) SIMMER - Add salt, pepper, whatever, to taste, and simmer. If it's too bitter, add some sweet stuff like sugar, honey, etc. Chiles are relatively bitter, you'll probably need to sweeten the mole at least a little bit.

7) That's it! You can simmer it for a long time, or not... Definitely gets better the next day.

I really like it over bean enchiladas, or grilled chicken, or pretty much anything. You can even put it on eggs! It's a really versatile sauce, and since there can be so many flavors in it, it goes with almost everything.

Using those 6 categories, the combinations are endless! By varying the type of chiles used, or the amount of sweetness, or the amount of other fruits or nuts, this base recipe could create an infinite variety of moles. This isn't entirely authentic, but the flavor is pretty close. If you follow these simple steps, in a matter of minutes you can be on your way to creating your own custom mole!

Saturday, December 17, 2011

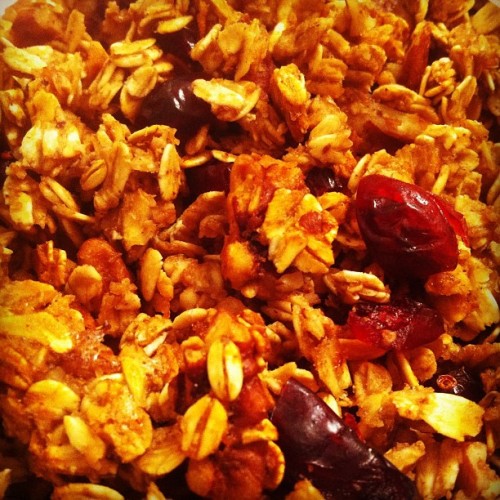
CB Cooks: Granola

Walnut cranberry apple (sauce) granola
If I don't think about it, I'll drink an entire pot of coffee in the morning without eating a single thing. I love coffee, and often I feel like that's all I need to get my day started. I've heard it isn't the greatest idea to drink mass quantities of coffee on an empty stomach, so I've been on a mission to find something easy and quick I can eat with my coffee. Sometimes I feel like making some oatmeal (like this fine recipe) but lately it hasn't been doing it for me.


My solution? Granola! It's just baked oatmeal. This is easy and quick to make (I've been making it once a week for the past two weeks... so I guess that's only twice....) and it's a perfect accompaniment to my requisite coffee in the morning.


WHAT YOU NEED for the basic granola recipe
2 cups of oats - the old school kind, but not the steel cut kind
1 cup of syrup/honey/similar stuff in some combination
4-6 tablespoons smooth apple sauce - this is the secret ingredient in my recipe; it is a substitute for oil, and it makes the whole thing taste much nicer and enhances whatever fruit you add
-I bet other types of puréed fruit would be awesome here- even jelly or jam might work
Salt (to taste)

SEASONINGS: To taste, add whatever you want
Lots of cinnamon
A lot of vanilla extract
Ginger might be nice, if you're in to that
Unsweetened cocoa (might burn, so be careful)
Brown sugar (would definitely make things sweeter)
Ground coffee (I might try this next time...)
Ground chile powder (i.e. ancho powder- this would be for the daring- I haven't tried this, but dried chiles are really just spicy dried fruit, it could be amazing)

ADDITIONS: Then you can add stuff like
Walnuts
Hazelnuts (paired with cocoa it'd be like nutella granola)
Dried fruit (like raisins, cranberries, blueberries, pineapple, peaches, mango, etc)
Pecans
Pepitas would be awesome
Dried coconut (this is really great with coffee)
Peanut butter (not sure if this would work, but it could be great)

HOW YOU MAKE IT
1. Combine your syrup/liquid stuff, apple sauce, and seasonings- mix well

2. Pour your liquid mixture into 2 cups of oats, stir until extremely well combined
Plain old oats with light syrup ready for baking

3. Spread out the mixture on a baking sheet, bake for 15 minutes at ~300°F
- If you want toasty nuts, you can add them now
- You could also add any dried fruit now, but they might get kind of hard and chewy by the time your granola is done

4. After 15 minutes, pull the sheet out and stir the whole thing well
- If you want your nuts less toasty and your fruit softer, add that stuff now instead of step #3

5. Return to oven, cook for another
15 minutes: soft, chewy granola
20 minutes: darker, more roasty granola, might be crispy
25 minutes: watch out, you might burn it! It will certainly be crispy

6. It will crisp up a little as it cools

7. Store in something airtight, otherwise it will get stale fast (I use a big zip lock bag- this recipe fills about a third of a gallon bag, at least I think it's a gallon bag)

8. Enjoy!

OTHER IDEAS
Sprinkle your homemade granola on other stuff, like ice cream, yogurt, etc.
Form into bars, make your own chewy granola bars
Instead of baking in the oven, add more liquid to the mixture and then fry on a griddle- oat cakes!

Sunday, December 11, 2011

CB Cooks: Extra crispy skillet potatoes

Mmmmmmmm!
It's been a major life goal of mine to cook diner-style hashbrown/home fried potatoes at home. Not only is it incredibly satisfying and simple to make, but you can make them EXTRA crispy. 99% of the time, I make mine in my cast iron skillet, but you can make them in any skillet-type kitchen cooking vessel. I have been in love with my cast iron skillet for some time now... In most of my cooking I use only 3 things: the cast iron skillet, the (cast iron) dutch oven, and the crock pot. In the summer I use the grill too.


I rarely use a microwave in cooking, but in this recipe it really is the secret ingredient! When I cook raw potatoes in the skillet, when the outside is nice and crispy but the inside is still raw and starchy. My solution is to pre-cook the potatoes in the microwave, cut them, THEN throw'em in the pan. By the time the outside is super crispy and delicious, the inside is heavenly soft like mashed potatoes.

Anyway, here is my recipe:

WHAT YOU NEED
- Potatoes - I've tried a bunch of different varieties, and they all pretty much work
- Oil - I've used olive, canola, and "vegetable;" they all work fine too
- Salt
- A skillet - I HIGHLY recommend a seasoned cast iron skillet! I think it's much easier to get the potatoes evenly crispy
- A microwave (I guess you could use an oven)

HOW YOU MAKE THEM
1) Prick some holes in the potatoes with a fork, wrap in paper towel, and throw in the microwave (If the 'taters are really big, you could just cut them in half)

2) Cook on high for 3-5 minutes, depending on size

3) When you hear the potatoes screaming in agony (you know, the high-pitched sound of the steam escaping) let them sit for a while

4) Heat up some oil (probably more than you think) in the skillet

5) Cut up the potatoes- the smaller you cut them, the more surface area there is to get nice and crispy

6) When a little piece of potato sizzles like crazy when you throw it in the skillet, dump the rest of the potatoes in

7) DON'T TOUCH! Let them sit there for 3-4 minutes; sprinkle some salt on top. You want the potatoes to develop a nice thick crust- if you move them now, the crust won't develop and the potatoes will soak up all the oil. Don't fill the pan too full either, or else the potatoes will steam instead of fry.

8) With a spatula, stir the potatoes, let sit again without touching for 3-4 minutes

9) Besides the microwave, this is the key to getting a nice crispy crust. Let them sit! If you stir fry them, it will never happen

10) Continue the stir-wait process for about 20 more minutes

11) Once they look evenly browned and crispy (like the picture), they're done! Add more salt to taste, and eat immediately!

WHAT ELSE YOU COULD DO
- I sometimes throw sautéed onions and poblano peppers in once the potatoes are almost done. Don't put those in at the beginning, they will surely burn
- These potatoes are great on their own, but even better paired with some delicious scrambled eggs with chorizo, onions, and poblano pepper strips
- If you cook in an oven-friendly vessel, you could plop these in a heated oven to keep them warm while you prepare other stuff
- Then again, another great thing about cast iron skillets is they stay warm for a long time, so maybe that's not even neccesary

Monday, November 28, 2011

Turkey Chipotle Tortilla Soup


I came back home this weekend with a container full of turkey and turkey stock... and some ideas! I've made "tortilla soup" before with the more usual chicken and chicken stock, but this is so tasty I had to share. The masa acts as a thickener and adds a wonderful corn flavor to the whole dish. Although I put some crumbled tortilla chips on top of the soup, really it's completely uneccesary- you get plenty of corn flavor from the masa and the kernel corn. I generally don't like soggy pieces of tortilla floating in my soup, which is why I add the masa instead of regular tortillas. After all, tortillas are made from masa! I also would have added some chopped cilantro after I was done simmering, but I didn't have any. Whole cooked beans would be great too.

Whatever you do, don't skip the lime juice! It really makes the dish.

WHAT YOU NEED
- Leftover turkey (cooked)
- Stock of some kind (homemade turkey stock would be the best, but chicken or veggie would be good too. The stock I had already had some carrots and celery in it- the more the merrier!)
- Onion, diced
- Garlic, minced or powdered (if using minced, quickly fry it before adding it to the pot)
- Some kind of diced green chile (I used poblano, you could use jalapeño or green bell pepper if you can't handle any heat)
- Chipotles en adobo (2 or more, diced) ***
- Some kind of dried red chile (I used ancho powder)
- A small can of tomato sauce (I used a 6oz can, I think)
- 2 tablespoons prepared dry masa, i.e. Maseca brand
- Corn (I used frozen yellow kernel corn)
- the juice of 1 small lime
- Salt, pepper, cumin

HOW YOU MAKE IT

1) Bring the stock and meat to a simmer
2) Add the chipotles, dried red chile, and tomato sauce
3) Combine the masa and some water in a glass; stir to combine, then pour into the pot
4) Taste and adjust seasonings, adding salt, pepper, garlic, and cumin etc. to taste
5) Once everything is nice and simmer-y, add in the onion and green chile
6) Simmer that stuff for about 5 minutes
7) Turn off the heat, then add the corn
8) Serve and enjoy! Even better the next day

SERVING SUGGESTIONS
Top with crumbled tortilla chips, or tortilla strips, more diced onions, avocado, julienned cabbage, pickled jalapeños, cilantro, etc.

*** Awesome tip! ***
When you buy a can of chipotles en adobo, sometimes it's hard to use all of them at once- especially if you're heat averse. The best way to save them for later is to pull out each chipotle and place it on a baking sheet covered with aluminum foil, then put that in the freezer. After a few hours, pick up the chiles and put them in a ziplock bag back in the freezer. Now you can grab as many or as few chipotles as you need for your recipe.


Chipotles en adobo (dried smoked jalapeños in a vinegar-tomato sauce)

Wednesday, October 19, 2011

CB Cooks: Roasted Squash and Apple Soup


It's actually squash, sweet potato, carrot, parsnip, and apple soup

As the weather gets colder, and my obsession with fishing gets more difficult to satisfy out in the cold, my fall cooking season is starting in earnest. I'm not done fishing for the year, but the weather is getting nastier and nastier... I've got to start doing some activities to replace my constant fishing fix. Cooking works great!

This is my combination of a bunch of different dishes I've had and really enjoyed. The inspiration for this dish comes from 3 places: 1) the squash and sweet potato soup from Big Bowl (it's very tasty, I highly recommend you get it) 2) A parsnip and apple soup Claire and I had on our honeymoon, and 3) A root vegetable purée from Brewery Vivant in Grand Rapids, Michigan. Don't let the possibly strange combination of squash and onion and apple turn you off- this is definitely worth trying. I think it's delicious! I was at the grocery store and saw some beautiful squash; here's what I did with it.

WHAT YOU NEED
Mmmmsquash
Squash - I used a big butternut squash grown by the good folks in Hudsonville, Michigan
Sweet potato - I used a single big one
Carrots - 2-3 would be good
Parsnip - I used just one, but adding more would be good too
Apple - we had a single golden delicious left in the fridge, and it was an excellent choice
Onion - I almost always use white onion
Garlic - you can never use too much
Stock or water - I didn't have any stock, I used plain old water
Oil - I used olive oil
Ginger, cinnamon, cumin, cayenne pepper, salt, and pepper
A splash of coconut milk would probably be great; some garam masala or curry powder would also be good

SPECIAL TOOLS
Oven - for roasting (this isn't completely necessary, but it concentrates the flavors)
Big pot - for making the soup - I used a dutch oven
Bean masher or immersion blender, or both, or just a regular blender - to get the soup thick and smooth

Roasted parsnip and carrots
HOW YOU MAKE IT
1) Roast the squash, sweet potato, carrots, and parsnip in a 400°F oven for about an hour (rub oil on the veggies and season with salt and pepper before roasting). You want everything to be soft and easily mashable. You'll probably want to take the carrots and parsnip out earlier than an hour. I cut the squash in two, and roasted it cut-side up, but you could also dice it and roast it that way. I didn't bother peeling the carrots or parsnips, but I peeled the sweet potato. Would probably be easier if you didn't peel that...

2) Once the veggies are roasted, get some diced onions sizzling in your big pot with some oil

3) When the onions are nice and sautéed, add a bunch of minced garlic and cook for about a minute

Roasted squash (I shouldn't have made
those cuts- made it hard to get the flesh out)

4) Mash up the roasted veggies (not the squash skin or sweet potato peel) and add to the pot

5) Add your liquid (stock or water) to the big pot, stir

6) Simmer

7) If you want it to be nice and smooth, use a bean masher, an immersion blender, or a regular blender. Careful! Blending hot liquids can be dangerous! I first used a bean masher to get the veggie chunks to a workable size, then I busted out my immersion blender to get everything nice and smooth

I caught an immersion blender-
must be about a 25-incher


8) Once the mixture is super creamy smooth, season with whatever seasonings you want. I used ginger, cinnamon, cayenne pepper, and cumin

9) Taste, adjust seasonings. If the mixture is too liquidy, let it simmer with the lid off for a while... But watch out for little explosions! Bubbles rising up from a thick liquid like this can be mini burning hot volcanos of scalding lava. I speak from experience.

10) Once you're happy with the consistency and flavor, turn off the heat and stir in some RAW diced apple. Yes, raw! The remaining heat in the soup will partially cook it, and it will keep some of that nice crunchy apple texture. If you want a completely smooth soup without bits of apple in it, either don't add the apple, or add it before you blend the soup


11) Ladle into a bowl, garnish with more raw diced apple on top

Adding the diced apple
WHAT ELSE COULD YOU DO?

- Cook some bacon, dice it up, put it back in the soup after you blend the veggies
- Next time I make this, I will most definitely add some puréed ancho or guajillo chile. Maybe even some fresh green chile too.
- Add a splash of coconut milk - the soup already has a hint of coconut even though there's none in it! This could be good
- Some similar recipes call for turmeric; although I don't think it adds too much flavor, it would make the soup a brighter orange color
- Add garam masala or curry powder - lots of squash soup recipes call for curry powder. I'm not sure exactly why, but it could work
- Add the onions after you blend the veggies, so you get more texture in the soup
- Some potato in the mix would probably be great; or turnips, rutabagas, any root vegetable would be a nice addition
- Some recipes call for the addition of a dairy product like yogurt, milk, cream, etc. I really don't think this is necessary; the soup is super creamy on it's own, and if you cook it with water or veggie stock and hold the pork, our vegan friends can enjoy it too.

Saturday, September 3, 2011

CB Cooks: Salmon Dill Pasta Salad [experimental]


The finished dish

In an effort to eat more fish and get used to cooking fish, I've been experimenting on some new recipes. I'm a big fan of Kat Keers' Tuna Pasta Salad with Dill, and have made my own version a few times. I have high hopes of catching some Lake Michigan salmon this fall, so I'd better figure out how to use it! This is definitely an experiment- this is my first time making it.

SALMON DILL PASTA SALAD [experimental]

L-R: black pepper, salt, red onion,
dill, crushed red pepper, smoked paprika, mayo, mustard
not pictured: the pasta
WHAT YOU NEED
Salmon (I used canned salmon... FYI there are usually little salmon bones in there with the meat)
Red onion (diced)
Dill
Cucumber pickles (diced)
Mayo
Mustard
Smoked Paprika
Pasta (I like macaroni for this)
Crushed red pepper (optional, but you should really put it in)
Salt
Pepper
Peas (I didn't have any, but I love them in Kat's tuna pasta salad.. they would be a great addition)

Wild! There are little bones in here,
but I think most people just eat them. Calcium!

HOW YOU MAKE IT

1) Make the pasta al dente

2) Mix everything but the pasta in a big bowl

3) Add the pasta

4) Adjust seasoning to taste

5) Refrigerate, enjoy cold


The salad, w/o pasta - could work great on sandwiches
CHRIS' NOTES

I think it turned out great! It looks pretty fancy, with all the bright green dill everywhere, and the pink hue of the salmon. Nice color combination. The flavor combination is pretty great, but I could have really used some peas or some other texture in there. The raw red onions add a great crunch. Next time I'll add way more pickles- or maybe fresh cucumbers. Some hard-boiled eggs might be nice too. The smoked paprika adds a tiny hint of smoked salmon flavor. Straight-up smoked salmon would probably be awesome in here instead of canned. This mixture, sans pasta, would definitely be a pretty kick-butt sandwich, maybe on some nice dark rye with sliced red onion.

If you like tuna salad, and want to go for something different, try this! If you catch a salmon from the big lake, give this recipe a try.

Wednesday, August 31, 2011

CB Cooks: Pickled Red Onions


Carnitas tacos with avocado salsa and pickled red onions

Here in the U.S. when we say pickle we almost always mean a cucumber pickle. The idea of pickling other stuff might seem weird, but it's a very popular way to preserve food throughout the world. Traditionally pickling was used to extend the life of the harvest, to enjoy summer vegetables in winter... But the side-effect of pickling is changing the flavor and texture of the pickled food, often for the better! At the very least you get something that is completely different than the fresh version.

Pickled red onions is a traditional Mexican accompaniment to dishes ranging from carnitas (roast fried pork), cochinita pibil (suckling pig slow-steamed in banana leaves underground), tacos, antojitos (snacks); and they are delicious on their own. Again, the idea of pickling anything that is not a cucumber might seem strange to us gringos, but it's really a delicious preparation. You get a nice crunch of onion, the tang of vinegar, and the flavors of whatever you added to the pickling liquid.

The first time I ever heard of pickling onions was from Rick Bayless' book "Rick Bayless' Mexican Kitchen" (a great read, full of awesome recipes). I made them, and was incredibly shocked- pickling the onions actually improved on fresh onions, and was the perfect addition for cutting through fatty or greasy foods. I've put these on tacos and tostadas, but they also work great on BBQ pork sandwiches, chili, even a bowl of straight up beans.

Rick calls for par-blanching the onions before they are pickled, but I don't usually do that.  Some people also simmer the pickling liquid to "wake up" the spices. You could also toast the spices in a dry pan. The recipe is so easy and quick, adding a few short minutes to the process is too much for me. Here is my simplified, super fast recipe.

PICKLED RED ONIONS
WHAT YOU NEED:
Red onion (you could use other onions, but these turn a beautiful shade of pink)
Vinegar (apple cider vinegar is traditional, but probably any vinegar would do the trick)
Water
Salt
Something to keep the onions in (like an old pickle jar)

Mmm how do you improve on this? Pickle it!
WHAT YOU MIGHT WANT:
Garlic
Whole black peppercorns
Dried red chiles
Fresh green chiles
Sugar
Mexican oregano
Whole cumin seed
Any combination of spices you like (allspice, cloves, paprika, mustard seed, etc)

HOW YOU MAKE THEM:

1) Slice the onions - sometimes I do rings, sometimes strips, sometimes I just roughly dice them. They will taste the same either way.

2) Put the onions in your container (like a pickle jar). Don't pack them too tight, they need to have some space to move and absorb the liquid.

3) Add a tablespoon or so of salt, and any other flavorings you desire. I usually stick with whole black peppercorns, whole cumin seeds, lightly crushed garlic cloves, and mexican oregano.

The "dry" ingredients
4) Fill up about 1/3 of the jar with vinegar, and fill the other 2/3 with water. If they turn out too sour, next time add less vinegar and more water. Too watery, next time more vinegar and less water. Not salty enough? Add more salt. I'm not big on exact recipes, because everybody likes things their own way. Experiment!

5) Stir/shake/invert so the pickle-y goodness gets in all the nooks and crannies

The onions and the pickling liquid, freshly shaken
6) Leave at room temperature for a couple hours, until the onions turn pink

8 hours later.... check out that awesome pink color!

7) Taste some, and adjust seasonings if necessary. Once they're good'n'tasty, kept covered in the fridge, they'll last a couple of weeks. Vinegar, cumin, pepper, chiles, mustard seed: these are all anti-microbial ingredients, which will keep the bad bacteria at bay. I'm no botulism expert, but I wouldn't recommend keeping these pickles (in the fridge) for more than a week or two.

CHRIS' NOTES

This pickling process works equally well for - believe it or not - cucumbers, and a whole range of other fruits and vegetables, like green tomatoes, jalapeños, etc. I've made cucumber dill pickles by using white vinegar instead of cider, omitting the cumin and oregano, upping the amount of garlic, and adding dill. I make pickled jalapeños using pretty much the same recipe as the onions. The sky is the limit! In general, when doing a quick-pickle like this, you want the freshest ingredients possible. Don't use past-their-prime veggies, because they will just taste like past-their-prime pickles. Get the good stuff.

Enjoy!

Tuesday, August 30, 2011

CB Cooks: Beans


Bean tacos with onions, cilantro, lime, and salsa on corn tortillas
Although I haven't mentioned it here yet, beans are hands down my absolute favorite food. A strange proclamation, I know, but they have so many great things going for them! They're cheap, full of fiber, full of protein, filling, easy to prepare, keep in the fridge, extremely varied, endlessly adaptable, and amazingly tasty. Some people think beans are "fillers" or used to stretch your "real" protein, but really they are delicious in their own right. There are also so many different kinds- creamy pintos, even creamier mayacobas, assertive kidneys, pleasantly soft lentils, ubiquitous black beans; and every culture has a different way to cook them.

Every cook has an opinion about cooking beans: salt or no salt, high heat or low heat, soaking or no soaking... I'm not going to join the argument, but will simply share my observations. I cook beans a lot.

- Adding salt or acidic ingredients (like tomatoes or chiles) at the beginning of cooking can toughen beans, sometimes
- The only benefit I can see in soaking beans is a slightly shorter cooking time... but since I almost always cook them in the crock pot, I don't really care
- Cooking beans at a rolling boil will destroy their shape, so you won't have many whole beans. Depending on their destination dish (like frijoles refritos), that might not matter

This is my weekly (sometimes more often) recipe for beans- pinto, black, mayacoba, kidney, whatever. They're all good! This is more or less based on traditional Mexican frijoles de olla, or "pot beans." The base recipe can be the starting point of a delicious chili or baked beans, or an accompaniment to a main course.

FRIJOLES DE OLLA a la Beckstrom


WHAT YOU DEFINITELY NEED:
Crock pot (or dutch oven)
Dry beans (my favorite are pinto)
Water
Salt

WHAT YOU MIGHT LIKE TO ADD:
Half a white onion

IF YOU WANT TO GET FANCY:
Garlic
Pepper
Chiles
Cumin
Epazote (fresh is best, dried will do, both smell horrible)
Mexican Oregano (dried is actually preferable)
Lard
Cilantro (never ever ever use dried cilantro!!)
Limes

HOW YOU MAKE IT
pretty awesome looking beans

1) Get good beans - Even though they are dried, freshness still counts. If bulk dried beans are an option, and there seems to be good turnover, choose those. They are likely fresher than those in plastic on the shelves, and fresher dried beans will cook faster.

2) Put the beans and half an onion in the crockpot, and put water up to the top. Add salt if you're feeling lucky. Don't worry about a beans to water ratio- you're not cooking rice! The more water you add, the more room the beans have to cook, and the more delicious bean liquor (that's seriously what it's called) you'll have to slurp up later. And don't worry about cooking beans in stock- once they're done, you'll have plenty of super delicious bean stock anyway.

If you want to get fancy, you could sauté some onions and garlic in lard, grab some árbol chiles, and some kind of pork product and throw it all in the crockpot with the beans. Honestly it's not always necessary; you can always add flavors once the beans are cooked and there's no danger of all your flavor being cooked away.

Epazote- smells bad, tastes bad,
but it's good with beans
Epazote is a pungent herb native to Mexico and the American southwest. I think it's actually a common weed in Los Angeles backyards (if you live there, go check!). It pretty much smells like gasoline, and not really in a good way. You might think it would make your beans taste like &%@#, but it actually adds a nice bite and subtle herby flavor. Epazote is often added to beans in Mexico, and almost always if they are black beans. Some people think it counteracts all the farting, but I don't buy that. The best way to fart less when you eat beans is to eat more beans! Your digestive system gets used to all the extra fiber and whatnot, and after a week or so you won't be driving all your coworkers and spouses away.

3) Put the crockpot on low

If using a dutch oven, bring it to a boil, then turn the heat down to a very gentle simmer. Make sure it doesn't boil over!

4) Go fishing for 7-8 hours (You could probably do something else during this time)

5) After 8 hours, come back to your house, which now smells like delicious beans (I think beans naturally have a hint of porkiness)

6) At this point, you can eat them as is, or add more ingredients (like chiles, salt, pepper, oregano, cumin; those are all good choices) OR use it as the start of a new recipe.... Like

FRIJOLES REFRITOS a la Beckstrom

It seems like "refritos" translates to "refried," but it most definitely does not. In colloquial mexican spanish, "re" is used to add emphasis. So if you take the verb "freír," add "re" to the front, it becomes "refreír" - to fry well. "Refrito" is the participle (or something) so "frijoles refritos" are "well-fried beans." Why fry beans? Because they taste even better that way! There's a whole lot of frying sauces and purées in traditional mexican cooking, and this is a great example of why that can be so tasty.
WHAT YOU DEFINITELY NEED:
Cooked beans, with all their juice from cooking (like the ones you just made above, or in a pinch, canned whole beans)
Oil (don't use olive oil, it makes the beans taste like olives. Canola oil works)
bean masher

WHAT YOU MIGHT WANT TO ADD:
More salt
Cumin

IF YOU WANT TO GET FANCY:
Put the beans and spices in a blender before you fry them
Get a bean masher
or use a potato masher
or use a regular old spoon

1) Heat up a pan - I always use my beloved cast iron skillet (more on that later)

2) Put some oil in the pan - This is actually optional... I have trouble not getting oil everywhere when I add the watery beans to the hot pan... Lately I've been adding oil AFTER adding the beans. I haven't quite figured this part out. If you don't add it here, add it in step 5 or 6. Or not.

3) Add a bean, make sure it sizzles. If it doesn't sizzle, the pan should be hotter

4) Add the beans and their liquid to the pan and enjoy the delicious sizzling sound

mashin' beans
5) If you want completely smooth refried beans, you probably should have put the (cooked) beans in a blender before step 4. If you want homestyle beans, mash the beans in the pan until they're mostly blended. I like the little bits of whole beans interspersed, but that's just me.

6) Add salt, and any other seasonings you want (I usually stick with cumin)

cumin seeds in a pepper grinder-
easy way to get fresh-ground cumin
7) The goal is to get the beans to become one mass of bean-pile, so when you scoop some across the pan, you can see the bottom of the pan. If things get too dry, add more bean juice. If your beans are too liquid-y, just give it time, and let the liquid escape as steam.

8) This should take around 5-10 minutes, but what you should have is a delicious, steaming, bubbling pan of nutritious, tasty beans. Adjust seasoning to taste, and either eat as is, or use in yet another recipe... like tacos, tostadas, bean burritos, sopes, tamales, 6 layer dip or whatever it's called, the list goes on!

Whether you eat the whole beans as is, or "well fry" them, great additions/toppings include cilantro, white onion, pickled red onion, jalapeños, hard mexican cheese, soft mexican cheese, that shredded "Mexican" blend cheese you get at the gringo store... but my personal favorite is a few spoonfuls of salsa. I like to eat the beans with warm tortillas (flour or corn, both are delicious) and hot sauce, and maybe a squeeze of some lime.

nice gloppy delicious beans
But this is just the beginning- the crockpot method works for pretty much any long-cooking bean (not lentils or split peas). Instead of buying canned beans full of preservatives and who knows what else, why not spend 2 minutes filling your crockpot with dry beans and enjoy the next 8 hours when your house smells delicious. And then you get to eat them!


Other dishes that start with whole cooked beans:
- Chili (pintos, kidneys)
- Baked beans (white beans, navy beans)
- Hummus (garbanzos, favas)
- Red beans and rice (red beans)
- Pasta i fagioli (white beans, garbanzos)
.... and more